
| 일 | 월 | 화 | 수 | 목 | 금 | 토 |
|---|---|---|---|---|---|---|
| 1 | 2 | 3 | ||||
| 4 | 5 | 6 | 7 | 8 | 9 | 10 |
| 11 | 12 | 13 | 14 | 15 | 16 | 17 |
| 18 | 19 | 20 | 21 | 22 | 23 | 24 |
| 25 | 26 | 27 | 28 | 29 | 30 | 31 |
- Xcode
- 인증
- MYSQL
- fido
- OTP
- 애플
- SWIFT
- MSYS2
- otpkey
- kmip
- 앨범북
- apple
- appres
- git
- 앱스토어
- SwiftUI
- openssl
- SSL
- 안드로이드
- MFA
- WebAuthn
- css
- 2FA
- albumbook
- Nodejs
- OSX
- FIDO2
- Android
- 앱리소스
- SSH
- Today
- Total
인디노트
Multi-Master Replication for PostgreSQL databases with Postgres-BDR 본문
Multi-Master Replication for PostgreSQL databases with Postgres-BDR
인디개발자 2018. 12. 30. 13:16One of the most challenging thing when scaling your backend to a new server cluster in a new region is replicating the databases. Most of the time, master-slave replication is not enough and you need to find a solution for master-master replication which can do the replicating job smoothly in realtime. And today we will learn how to setup a multi-master replication for PostgreSQL database with Postgres-BDR.
새로운 영역에서 새 서버 클러스터로 백엔드를 확장 할 때 가장 어려운것 중 하나는 데이터베이스를 복제하는 것입니다. 대부분의 경우 마스터 - 슬레이브 복제로는 충분하지 않으며 복제 작업을 실시간으로 원활하게 수행 할 수 있는 마스터 - 마스터 복제 솔루션을 찾아야합니다. 우리는 여기에서 Postgres-BDR 을 사용하여 PostgreSQL 데이터베이스를 위한 다중 마스터 복제를 설정하는 방법을 배우게 될 것입니다.
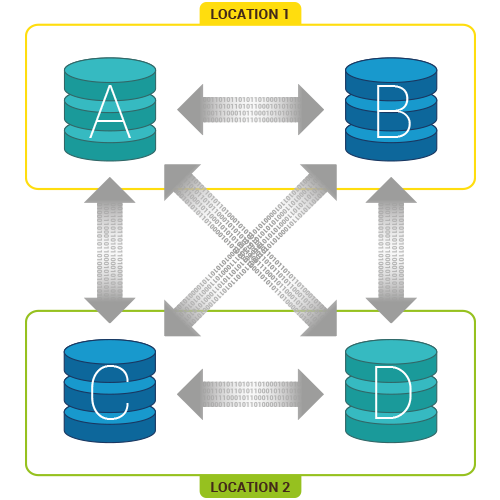
Bi-Directional Replication for PostgreSQL (Postgres-BDR, or BDR) is the first open source multi-master replication system for PostgreSQL to reach full production status.
PostgreSQL 의 양방향 복제 (Postgres-BDR 또는 BDR)
는 PostgreSQL 전체 제품군 중에서 첫 번째 오픈 소스 다중 마스터 복제 시스템입니다.
0. What if I already have a running PostgreSQL database system?
0. PostgreSQL 데이터베이스 시스템이 이미 실행 중이면 어떻게합니까?
That is a bad news but don’t worry, we can deal with it. In this case we need to dump all the data and restore it to the new PostgreSQL server with Postgres-BDR plugin. For dumping the database, you can take a look at: https://www.postgresql.org/docs/9.4/static/backup-dump.html
그건 좀 어렵지만 걱정할 필요는 없습니다. 우리는 그것을 다룰 수 있습니다. 이 경우 모든 데이터를 덤프하고 Postgres-BDR 플러그인을 사용하여 새 PostgreSQL 서버에 복원해야합니다.
데이터베이스 덤프에 대해서 다음을 참조하시면 됩니다.
https://www.postgresql.org/docs/9.4/static/backup-dump.html
If your database is small, this process may be really fast, but if your database is really big, be carefully and choose a good time for doing this to prevent downtime to your application.
데이터베이스가 작으면 이 프로세스가 매우 빠를 수 있지만 데이터베이스가 매우 큰 경우 조심스럽게 작업을 수행하여 응용 프로그램의 작동 중지 시간을 방지하시기 바랍니다.
1. Building PostgreSQL with Postgres-BDR from source
1. 소스코드로 Postgres-BDR 와 PostgreSQL 빌드
In this example, I assume we are doing replication on 2 server, we must do all steps in part 1 and 2 on two servers
여기에서 우리는 2 대의 서버를 이용해서 DB 복제 수행을 가정하고, 두 서버에서 1 단계와 2 단계의 모든 단계를 수행해야합니다
- server 1: 10.0.0.1
- server 2: 10.0.0.2
For replication, you need to install a special PostgreSQL with Postgres-BDR plugin. Although we can install with apt-get or yum or aptitude . I strongly recommend we should build everything from source. We do this to make sure every node we make in the future use the same version with currently thing we make. In this tutorial, I will use postgres version 9.4.12 and bdr version 1.0.2.
복제를 위해서는 Postgres-BDR 플러그인과 함께 특별한 PostgreSQL 을 설치해야 합니다. 우리는 apt-get 또는 yum 또는 aptitude 로 그것들을 설치 할 수 있습니다. 하지만 저는 소스코드를 이용해서 모든것을 빌드하는것을 강력하게 권장하고 있습니다. 우리는 앞으로 우리가 만드는 모든 노드가 현재 동일한 버전을 사용하고 있는지 확인하기 위해 이 작업을 수행합니다. 이 튜토리얼에서는 Postgres 버전 9.4.12 와 BDR 버전 1.0.2 를 사용합니다.
Ok, let’s download two files below
이제, 아래 두개의 파일을 다운로드 하시기 바랍니다.
$ cd ~
$ wget https://github.com/2ndQuadrant/bdr/archive/bdr-pg/REL9_4_12-1.tar.gz
$ tar -xzvf REL9_4_12-1.tar.gz
$ wget https://github.com/2ndQuadrant/bdr/archive/bdr-plugin/1.0.2.tar.gz
$ tar -xzvf 1.0.2.tar.gz
Now we need to install some dependencies before building:
소스코드를 빌드하기 전에 몇 가지 종속된 내용을 설치해야합니다.
$ sudo sh -c 'echo "deb-src http://apt.postgresql.org/pub/repos/apt/ $(lsb_release -cs)-pgdg main 9.4" > /etc/apt/sources.list.d/pgdg.list'$ sudo apt-get install wget ca-certificates
$ wget --quiet -O - https://www.postgresql.org/media/keys/ACCC4CF8.asc | sudo apt-key add -
$ sudo apt-get update
$ sudo apt-get upgrade
$ sudo apt-get build-dep postgresql-9.4
Then we can build everything now:
이제, 우리는 모든 것을 빌드 할 수 있습니다.
$ cd ~/bdr-bdr-pg-REL9_4_12-1
$ ./configure --prefix=/usr/lib/postgresql/9.4 --enable-debug --with-openssl
$ make -j4 -s install-world
$ cd ~/bdr-bdr-plugin-1.0.2
$ PATH=/usr/lib/postgresql/9.4/bin:"$PATH" ./configure
$ make -j4 -s all
$ make -s install
2. Setup for replication
2. 설정
First, we will create a new database with bdr turned on.
먼저 bdr 이 가동중인 상태에서 새로운 데이터베이스를 생성합니다.
$ createuser postgres/var/lib/postgresql
$ mkdir -p/var/lib/postgresql
$ chown postgres:postgressudo usermod -d /var/lib/postgresql postgres
$
$ su -l postgres
$ export PATH=/usr/lib/postgresql/9.4/bin:$PATH
$ mkdir ~/9.4-bdr
$ initdb -D ~/9.4-bdr -A trust
Edit file ~/9.4-bdr/postgresql.conf , find those lines and change the value as below, those lines already availble in the file:
~/9.4-bdr/postgresql.conf 파일을 편집기로 열고 다음과 같은 내용을 찾아 값을 변경하시기 바랍니다.
listen_addresses = '*'
shared_preload_libraries = 'bdr'
wal_level = 'logical'
track_commit_timestamp = on
max_connections = 100
max_wal_senders = 10
max_replication_slots = 10
max_worker_processes = 10
Edit file ~/9.4-bdr/pg_hba.conf , add those lines for enable communication between two server:
~/9.4-bdr/pg_hba.conf 파일을 편집기로 열어, 두 서버 사이의 통신을 가능하게 하기 위해서 다음과 같은 내용을 추가 하시기 바랍니다.
local   replication     postgres                        trust
host    replication     postgres        127.0.0.1/32    trust
host    replication     postgres        ::1/128         trust

host all all 0.0.0.0/0  password

host replication postgres 10.0.0.1/32 trust
host replication postgres 10.0.0.2/32 trust

host replication bdrsync 10.0.0.1/32 password
host replication bdrsync 10.0.0.2/32 password
Ok, now we have a new database at ~/9.4-bdr . Let’s repeat all step from part 1 and 2 all two server. Then we need to run the new PostgreSQL server:
자, 이제 ~/9.4-bdr 에 새로운 데이터베이스가 생겼습니다. 두개의 서버에서 파트 1과 파트 2의 모든 단계를 수행해야 합니다. 그런 다음 새로운 PostgreSQL 서버를 실행해야합니다.
(in terminal of postgres user)$ export PATH=/usr/lib/postgresql/9.4/bin:$PATH
$ pg_ctl -l ~/log -D ~/9.4-bdr start
$ psql -c "CREATE USER bdrsync superuser;"
$ psql -c "ALTER USER bdrsync WITH PASSWORD '12345#';"Note that 12345# is our password for replication between server, you need to keep this password carefully as hackers may stole your data with some brute force technics (of course we can prevent this by a simple firewall for IPs and port)
'12345#' 는 서버간 복제를 위한 암호이므로 해커가 일부 무차별 기술로 데이터를 훔쳐 갈 수 있습니다. 이 암호를 다른 어려운 암호로 변경하여 사용하시고, 암호를 신중하게 관리 해야합니다. (물론 IP 및 포트에 대한 간단한 방화벽으로 이를 방지 할 수 있습니다.)
3.1. Restore dump database (for ongoing database)
3.1. 덤프 데이터베이스 복원 (진행중인 데이터베이스의 경우)
Now, if you have a database to restore, you can do it now. If not and you are going to create a fresh database, let’s go to step 3.2.
이제, 복원 할 데이터베이스가 있다면 지금 하시기 바랍니다. 그렇지 않고 새 데이터베이스를 만드는 것이라면 다음 3.2 단계로 이동하시기 바랍니다.
Note that if you are going to restore the database, only do this on the master server (server 1) as we will replicate it in server 2 later.
데이터베이스를 복원 하려는 경우 마스터 서버 (서버 1) 에서 만 이 작업을 수행 하셔야 합니다. 나중에 서버 2 에 복제됩니다.
3.2. Create new database
3.2. 새 데이터베이스 만들기
Let’s create a new user test_user with a new database test_db for demo
데모용으로 새로운 데이터베이스 test_db 를 사용하여 새로운 사용자 test_user 를 만들어 보겠습니다.
(in terminal of postgres user)$ createuser test_user
$ createdb -O test_user test_db
$ psql test_db -c 'CREATE EXTENSION btree_gist;'
$ psql test_db -c 'CREATE EXTENSION bdr;'3.3. Create a master node in server 1
3.3. 서버 1 에서 마스터 노드 생성
(in terminal of postgres user)psql
\c test_db
SELECT bdr.bdr_group_create(
local_node_name := 'node1',
node_external_dsn := 'host=10.0.0.1 user=bdrsync dbname=test_db password=12345#'
);3.4. Join master node in server 2
3.4. 서버 2 에서 마스터 노드 연결
(in terminal of postgres user)psql
\c test_db
SELECT bdr.bdr_group_join(
local_node_name := 'node2',
node_external_dsn := 'host=10.0.0.2 user=bdrsync dbname=test_db password=12345#',
join_using_dsn := 'host=10.0.0.1 user=bdrsync dbname=test_db password=12345#'
);Ok now you should see server 2 do the replication process the database in server 1 (if you have a database in server 1), this may take a while before two nodes become sync to each other and do realtime replication. It is based on the network between two server.
이제 서버 2 가 서버 1 의 데이터베이스를 복제 처리합니다. (서버 1 에 데이터베이스가 있는 경우). 두 노드가 서로 동기화되고 실시간 복제를 하기까지 시간이 걸릴 수 있습니다. 그것은 두 서버 사이의 네트워크를 기반으로 합니다.
* Some commands which may be useful *
* 유용하게 사용할 수 있는 몇개의 명령 *
View bdr nodes and connections:
bdr 노드 및 연결 보기 :
(in psql terminal of the database)
select * from bdr.bdr_nodes;
select * from bdr.bdr_connections;
To drop replication from a node, this will remove the node from replication with other servers
노드에서 복제를 삭제하려면, 다른 서버와의 복제에서 노드를 제거
(in psql terminal of the database)
select bdr.remove_bdr_from_local_node(true)
'개발 플랫폼 및 언어 > DB 기술' 카테고리의 다른 글
| BDR 1.0.7 Documentation - 1.3. Differences between BDR and trigger-based replication (0) | 2018.12.31 |
|---|---|
| BDR 1.0.7 Documentation - 1.2. Differences between logical (row level) and physical (block level) replication (0) | 2018.12.31 |
| BDR 1.0.7 Documentation - 1.1. Concepts (0) | 2018.12.31 |
| BDR 1.0.7 Documentation (0) | 2018.12.31 |
| Top PG Clustering HA Solutions for PostgreSQL (0) | 2018.12.30 |